
 Back to home
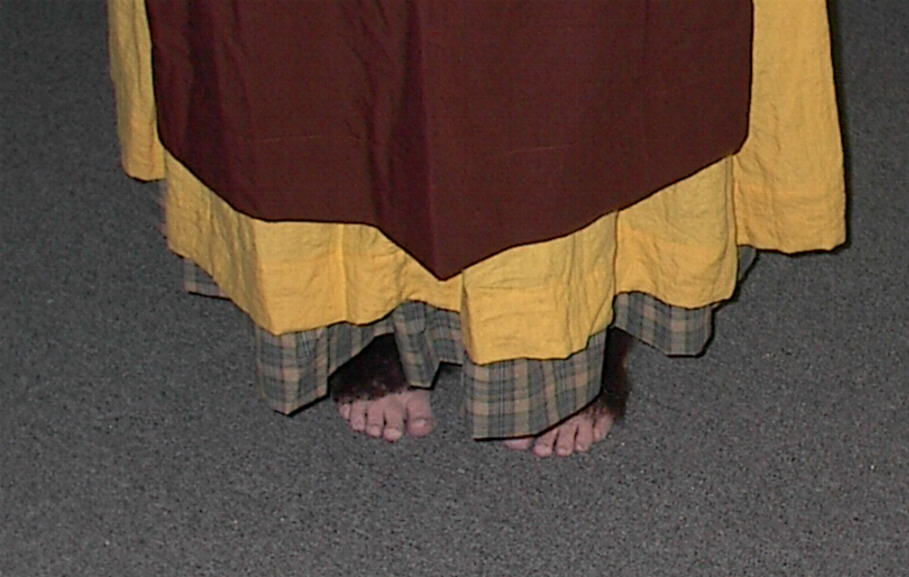
Of Hairy Feet and Hobbit Toes
("Hair Club for Hobbits!")
If you don't have the hairy feet, no one will catch on that you're a hobbit. So, how to make your feet hairier than they may already be:
First I tried simply taking a mat of wool (some people use doll hair)
and gluing it on my foot using sock glue. It worked ok, but it still
sorta looked like a mat of stuff
Now other people have taken clippings of
their own hair, or used doll hair and glued the curls down on their
feet
using spirit gum. Personally, I find that the hair all lies flat and
doesn't look right, so I didn't want to do that.
Carolyn, of OneRingCircus, has taken to making patches that she sticks on her feet. Basically, you start with a piece of pantyhose cut to the size you want, coat it with liquid latex, and then start applying small bits of hair to the top side of it. When it dries, you have a reusable hair patch (that looks a little like a skinned rat!). She's got a study page showing how to do this at <Carolyn's Frodo Costume Feet> . Now, I made a couple of errors when I tried this. First, I slid a stocking over my foot (having applies the liquid latex to hold it in place) and then I cut around leaving the foot patch. I figured this way it would be exactly where I wanted it. Wrong on two counts! First, you don't want it stretched ahead of time, because then when you peel it off it returns to unstretched size and just makes a mess and doesn't reuse as well. Second..... shave your foot first. It's really painful pulling that stuff off what little hair you may have! Oh, and shave it with water or cream - don't dry shave; that irritated skin really doesn't like the ammonia in the liquid latex. ow.
So my trials with Carolyn's feet didn't work out too well (but my friend had fun ripping the piece off my poor foot!), although I've seen hers on her and it looks good.
Leah, also of OneRingCircus, has gone one step further with making hair patches. She actually got chosen by Weta to be made up in an actual movie hobbit costume for a ComicCon, and have their pro makeup people do their thing. So she has seen the hobbit foot prosthetics and separate hair wigs (did you know they are separate pieces? There's really not much hair on the actual 'shoe') up close and personal. Leah decided to try the professional way of using actual wiglace, and using a ventilating tool to handknot each hair on to it. You can see her efforts at creating Sam's feet at <hobbit feet> . I've seen her feet also, and they look good.
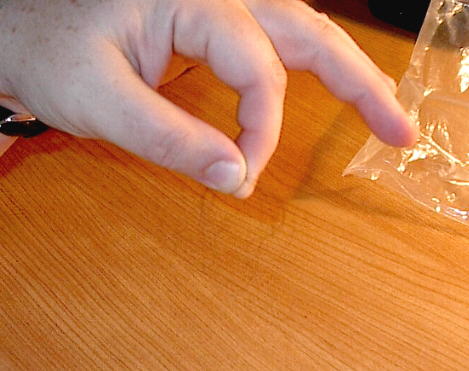
netting that matches your skin
So I decided to give this method a try. But wig lace is far too expensive for my tastes and so is the tool for it. I talked with a friend who has made beards and she showed me: start with maybe 1/4yd of netting. Not tulle - although you can use that also - but netting. A quarter yard will make probably about 5 pairs or so, and only cost maybe $0.25 or so. Plenty to practice on. Oh, and get a color that matches your skin tone as best as possible, I found the 'peach' completely disappears against my skin, but the ivory is also a good match. then you get this little tool called a 'knit picker'. It's sold in a blister pack and looks just like the small seam rippers -same size, same blue handle and clear cover - but instead of having the ripper point, this has a teeny tiny latch hook on it! It's meant for reaching through from the back of knits to pull any snags to the back so you don't see them. That's why it's called a 'knit picker'. But, since it's a teeny latch hook, it will tie knots just like in hooking rugs. But on a teeny scale. Just what you want to do. And it only costs barely $2. That's all you need for tools. Get some doll hair (personally I still have a LOT of that spelsau wool batting) or something that when folded in half will be close to the length you want, and a flexible piece of paper to use as a pattern.
draw a pattern
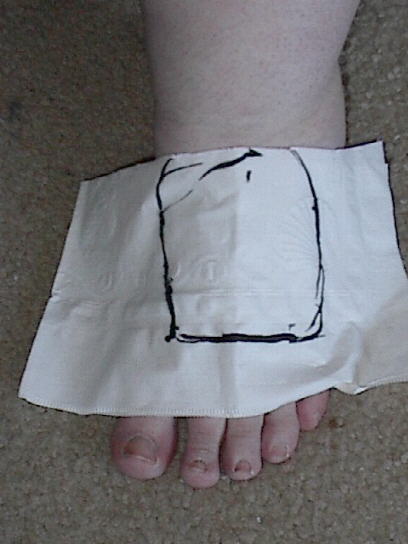 Take the paper (I found a napkin to be handy) and trace the shape you
want covered with hair on your foot. Now put the paper on your foot and
draw on the paper, don't draw on your foot! A napkin is just nice and
flexible and will drape nicely. You probably do NOT want to go
above the bend of your ankle, the glue won't hold it well when you
start
flexing your foot. Don't worry, having the hair just on the top
of your foot looks fine. Once you have your pattern, sit down
with a good long movie and get comfy. Make sure you have good light.
Place the netting on top of the pattern so you can see where your edges
will be. No, it won't work to keep the pattern underneath all the time,
just trust me, and you probably don't want to try to draw the pattern
onto the netting either.
Take the paper (I found a napkin to be handy) and trace the shape you
want covered with hair on your foot. Now put the paper on your foot and
draw on the paper, don't draw on your foot! A napkin is just nice and
flexible and will drape nicely. You probably do NOT want to go
above the bend of your ankle, the glue won't hold it well when you
start
flexing your foot. Don't worry, having the hair just on the top
of your foot looks fine. Once you have your pattern, sit down
with a good long movie and get comfy. Make sure you have good light.
Place the netting on top of the pattern so you can see where your edges
will be. No, it won't work to keep the pattern underneath all the time,
just trust me, and you probably don't want to try to draw the pattern
onto the netting either.
Begin towards the toe of the pattern and work back towards the ankle. This way your hairs will overlap each other in a more normal 'growth' pattern and your hair will grow over your feet and toes (if it's long enough) and not up your leg. Cut a piece of the netting a bit larger than your pattern so that it's easier to hold. It's netting, so you don't need to finish the edges, but you will want a little bit of an edge for easy handling when it's finished.
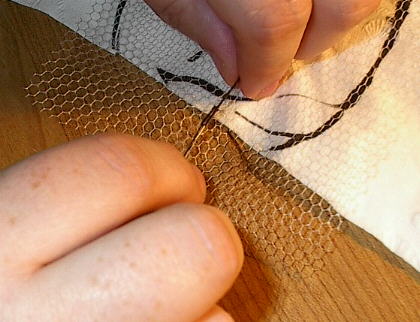
poke the knit-picker through the netting
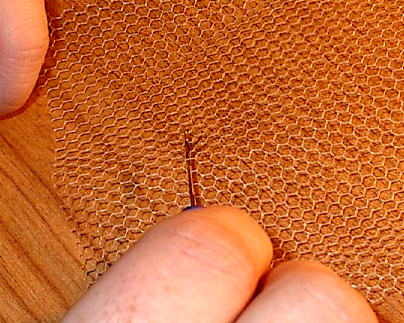
Poke the hook under a line of the netting (notice it's all hexagonal lines? I found it easier to work horizontally) and come up through it. Now you have a 'thread' of the netting on your hook across the neck - you went under and out with the tool.
pick up a few strands of hair

Make sure the latch of the tool is open and pick up the loop of maybe 4 hairs or less that you are holding in a U shape (folded in half) with your other hand. As you pull the tool back out of the netting, you'll see the latch close (it closes because that 'thread' of the netting pushes it closed!).
pull the loop through, and pull the stem through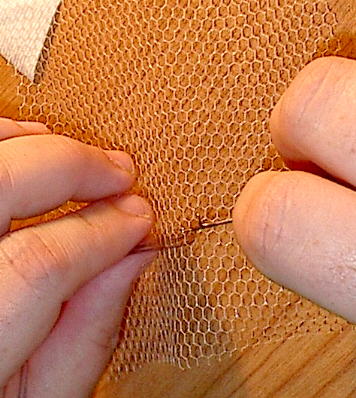
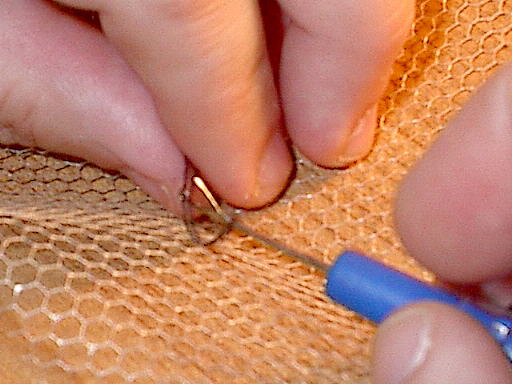
Now once it's pulled some of the loop out, push the tool forwards again (on top of the netting) so that the latch opens and you can catch the remaining tuft of that loop of hair (the original loop is now down the shaft of the tool) and pull it through the loop. It makes a knot around the 'thread' of the netting.
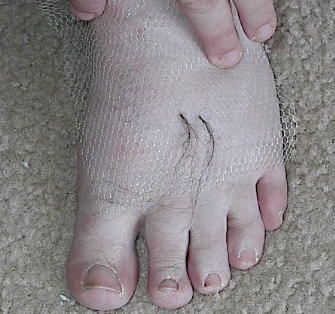
tighten the knot
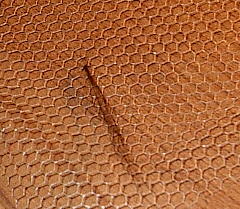
Last thing you want to do is to give it a good tug with your fingers and tighten that knot. A loose knot will look really ugly when you're finished, and it's a lot harder to get through the wispy hairs after the fact. And yes, they do tend to loosen as time goes. the tighter the better to start.
plan your next knot from your pattern
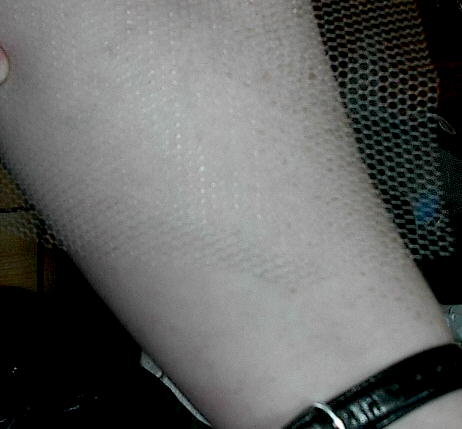
So do a line of these tiny knots, probably skipping a hole or two for spacing. If you don't space out your knots, it will be much too full and work more for a beard! Just look at your arm and see that the hairs really are spaced apart a bit. That's what you want to simulate. Check against your pattern to see how long a line you need to knot.
When you get ready for the second line, stagger it like a checkers board. If you don't, you'll have hair growing in straight lines like an orchard and it will look very strange. hair is much more random than that.
Keep checking against your pattern for where you want to start and stop your rows (don't expect it to be all like a straight box, sometimes it's wider and sometimes it's narrower - at least it is on my foot - I want it longer over my big toe than over my little toes). It's really pretty easy. Almost mind numbing once you get the hang of the latch hooking (that's why you want a good movie you don't need to watch too hard. I watched Labyrinth!)
Hair plugs!
By the way, be prepared to make at least 3 toupees: the first one, while you'll be very proud of it, the next day you'll look at it and think it looks like hair plugs! You'll get better each time and they'll really start to look like hair on your foot.
When you've finished one foot wig, trim the border of the netting to the approximate size and shape. Feel free to trim the hairs a little shorter to fit well on your feet Leave a little bit of a border, because when you glue it down you don't want to be holding onto the hair! As to the gluing...
Well, my first thought was of course sock glue. It worked fairly nicely for the mats so I tried it for the wigs. eh.... not so good. Couldn't get it to stick enough to the netting and my edges kept coming up. I kept checking all night long to make sure I didn't lose one. <sigh> Next I tried liquid latex on a very small sample piece I made to get used to the hooking technique. Bad idea DON'T DO IT! The liquid latex sunk into the hair and just made a terrible mess trying to stick it on (and it's very difficult getting the stuff off hair - if you've ever used it around your ears, you'll know). When it dried and I went to pull it off I was terrified of ripping the netting apart. Not really a reausable method. Don't go there.
Ok, that left spirit gum. For some reason I always want to avoid using the stuff. I don't know why. But I tried it for a convention and it was fine. I outlined the area where the patch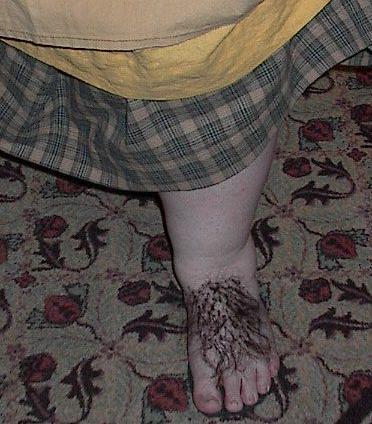 would
go, I didn't
paint the
entire underside. I tapped the wig into place - be careful, like any
adhesive it's on your fingers and when you press into the stuff the
hair
will want to stick to you when you take your hand away. But it held the
edges just fine,
you really can't see the netting edge unless you look hard for it. When
it came time to remove it, I just peeled it off - no remover, it really
didn't seem to need it, then I washed my feet to remove the adhesive
there. And that's it. I can reuse them without any problem, they work
fine.
would
go, I didn't
paint the
entire underside. I tapped the wig into place - be careful, like any
adhesive it's on your fingers and when you press into the stuff the
hair
will want to stick to you when you take your hand away. But it held the
edges just fine,
you really can't see the netting edge unless you look hard for it. When
it came time to remove it, I just peeled it off - no remover, it really
didn't seem to need it, then I washed my feet to remove the adhesive
there. And that's it. I can reuse them without any problem, they work
fine.
Oh yeah. There is still the pesky problem of 'no shoes - no service'. There's a couple of ways to get around that. I bought a product called 'Sticky Shoes' but they seem to be out of business. However someone new is taking up the slack! The business is called Stick2Feet and they seem to be the same thing although they're low on solid colors right now. They are interesting, it's basically a thin flip-flop sole with adhesive so that it sticks to your entire foot and you don't need a thong. You can trim them with scissors to your own foot size and shape. Feels really bizarre when you peel them off. I would strongly suggest if you want to try to buy a pair, that you call them on the phone to order. Another solution is what Leah did: buy a pair of flip-flops, pull out the thong and replace it with clear plastic instead. Just be careful how the thong will interact with the foot wig! You may even want to consider making it in pieces to put around the thong (never tried it, but you probably could).
And if you can't get the Stick2Feet, and you don't want even a clear thong messing up your foot hair, you can try my version: buy a flip-flop (in season you can get them for $1!), pull off the thong and throw it away. Go to a wig store and buy some wig/toupee tape: it comes in regular strips the size of bandaids (50 to a box usually) or ask for "hurricane strength" that will probably come on a roll. Wash and dry your feet well, and put on 2 or 3 strips of tape: one across the ball of your foot, one from the heel up the side of your foot, and if you are particularly flat footed you might want a third strip from your heel closer to your arch. Then step onto the flip-flop starting at the heel and slowly roll your foot onto it. Stand firmly for a few seconds to adhere it well. On me they are good all day. If you have particularly sweaty feet you might want to try some spray anti-perspirant first, just make sure it's good and dry before you put the tape on.
Carolyn, of OneRingCircus, has taken to making patches that she sticks on her feet. Basically, you start with a piece of pantyhose cut to the size you want, coat it with liquid latex, and then start applying small bits of hair to the top side of it. When it dries, you have a reusable hair patch (that looks a little like a skinned rat!). She's got a study page showing how to do this at <Carolyn's Frodo Costume Feet> . Now, I made a couple of errors when I tried this. First, I slid a stocking over my foot (having applies the liquid latex to hold it in place) and then I cut around leaving the foot patch. I figured this way it would be exactly where I wanted it. Wrong on two counts! First, you don't want it stretched ahead of time, because then when you peel it off it returns to unstretched size and just makes a mess and doesn't reuse as well. Second..... shave your foot first. It's really painful pulling that stuff off what little hair you may have! Oh, and shave it with water or cream - don't dry shave; that irritated skin really doesn't like the ammonia in the liquid latex. ow.
So my trials with Carolyn's feet didn't work out too well (but my friend had fun ripping the piece off my poor foot!), although I've seen hers on her and it looks good.
Leah, also of OneRingCircus, has gone one step further with making hair patches. She actually got chosen by Weta to be made up in an actual movie hobbit costume for a ComicCon, and have their pro makeup people do their thing. So she has seen the hobbit foot prosthetics and separate hair wigs (did you know they are separate pieces? There's really not much hair on the actual 'shoe') up close and personal. Leah decided to try the professional way of using actual wiglace, and using a ventilating tool to handknot each hair on to it. You can see her efforts at creating Sam's feet at <hobbit feet> . I've seen her feet also, and they look good.
netting that matches your skin
So I decided to give this method a try. But wig lace is far too expensive for my tastes and so is the tool for it. I talked with a friend who has made beards and she showed me: start with maybe 1/4yd of netting. Not tulle - although you can use that also - but netting. A quarter yard will make probably about 5 pairs or so, and only cost maybe $0.25 or so. Plenty to practice on. Oh, and get a color that matches your skin tone as best as possible, I found the 'peach' completely disappears against my skin, but the ivory is also a good match. then you get this little tool called a 'knit picker'. It's sold in a blister pack and looks just like the small seam rippers -same size, same blue handle and clear cover - but instead of having the ripper point, this has a teeny tiny latch hook on it! It's meant for reaching through from the back of knits to pull any snags to the back so you don't see them. That's why it's called a 'knit picker'. But, since it's a teeny latch hook, it will tie knots just like in hooking rugs. But on a teeny scale. Just what you want to do. And it only costs barely $2. That's all you need for tools. Get some doll hair (personally I still have a LOT of that spelsau wool batting) or something that when folded in half will be close to the length you want, and a flexible piece of paper to use as a pattern.
draw a pattern
Take the paper (I found a napkin to be handy) and trace the shape you
want covered with hair on your foot. Now put the paper on your foot and
draw on the paper, don't draw on your foot! A napkin is just nice and
flexible and will drape nicely. You probably do NOT want to go
above the bend of your ankle, the glue won't hold it well when you
start
flexing your foot. Don't worry, having the hair just on the top
of your foot looks fine. Once you have your pattern, sit down
with a good long movie and get comfy. Make sure you have good light.
Place the netting on top of the pattern so you can see where your edges
will be. No, it won't work to keep the pattern underneath all the time,
just trust me, and you probably don't want to try to draw the pattern
onto the netting either. Begin towards the toe of the pattern and work back towards the ankle. This way your hairs will overlap each other in a more normal 'growth' pattern and your hair will grow over your feet and toes (if it's long enough) and not up your leg. Cut a piece of the netting a bit larger than your pattern so that it's easier to hold. It's netting, so you don't need to finish the edges, but you will want a little bit of an edge for easy handling when it's finished.
poke the knit-picker through the netting
Poke the hook under a line of the netting (notice it's all hexagonal lines? I found it easier to work horizontally) and come up through it. Now you have a 'thread' of the netting on your hook across the neck - you went under and out with the tool.
pick up a few strands of hair
Make sure the latch of the tool is open and pick up the loop of maybe 4 hairs or less that you are holding in a U shape (folded in half) with your other hand. As you pull the tool back out of the netting, you'll see the latch close (it closes because that 'thread' of the netting pushes it closed!).
pull the loop through, and pull the stem through
Now once it's pulled some of the loop out, push the tool forwards again (on top of the netting) so that the latch opens and you can catch the remaining tuft of that loop of hair (the original loop is now down the shaft of the tool) and pull it through the loop. It makes a knot around the 'thread' of the netting.
tighten the knot
Last thing you want to do is to give it a good tug with your fingers and tighten that knot. A loose knot will look really ugly when you're finished, and it's a lot harder to get through the wispy hairs after the fact. And yes, they do tend to loosen as time goes. the tighter the better to start.
plan your next knot from your pattern
So do a line of these tiny knots, probably skipping a hole or two for spacing. If you don't space out your knots, it will be much too full and work more for a beard! Just look at your arm and see that the hairs really are spaced apart a bit. That's what you want to simulate. Check against your pattern to see how long a line you need to knot.
When you get ready for the second line, stagger it like a checkers board. If you don't, you'll have hair growing in straight lines like an orchard and it will look very strange. hair is much more random than that.
Keep checking against your pattern for where you want to start and stop your rows (don't expect it to be all like a straight box, sometimes it's wider and sometimes it's narrower - at least it is on my foot - I want it longer over my big toe than over my little toes). It's really pretty easy. Almost mind numbing once you get the hang of the latch hooking (that's why you want a good movie you don't need to watch too hard. I watched Labyrinth!)
Hair plugs!
By the way, be prepared to make at least 3 toupees: the first one, while you'll be very proud of it, the next day you'll look at it and think it looks like hair plugs! You'll get better each time and they'll really start to look like hair on your foot.
When you've finished one foot wig, trim the border of the netting to the approximate size and shape. Feel free to trim the hairs a little shorter to fit well on your feet Leave a little bit of a border, because when you glue it down you don't want to be holding onto the hair! As to the gluing...
Well, my first thought was of course sock glue. It worked fairly nicely for the mats so I tried it for the wigs. eh.... not so good. Couldn't get it to stick enough to the netting and my edges kept coming up. I kept checking all night long to make sure I didn't lose one. <sigh> Next I tried liquid latex on a very small sample piece I made to get used to the hooking technique. Bad idea DON'T DO IT! The liquid latex sunk into the hair and just made a terrible mess trying to stick it on (and it's very difficult getting the stuff off hair - if you've ever used it around your ears, you'll know). When it dried and I went to pull it off I was terrified of ripping the netting apart. Not really a reausable method. Don't go there.
Ok, that left spirit gum. For some reason I always want to avoid using the stuff. I don't know why. But I tried it for a convention and it was fine. I outlined the area where the patch
would
go, I didn't
paint the
entire underside. I tapped the wig into place - be careful, like any
adhesive it's on your fingers and when you press into the stuff the
hair
will want to stick to you when you take your hand away. But it held the
edges just fine,
you really can't see the netting edge unless you look hard for it. When
it came time to remove it, I just peeled it off - no remover, it really
didn't seem to need it, then I washed my feet to remove the adhesive
there. And that's it. I can reuse them without any problem, they work
fine.Oh yeah. There is still the pesky problem of 'no shoes - no service'. There's a couple of ways to get around that. I bought a product called 'Sticky Shoes' but they seem to be out of business. However someone new is taking up the slack! The business is called Stick2Feet and they seem to be the same thing although they're low on solid colors right now. They are interesting, it's basically a thin flip-flop sole with adhesive so that it sticks to your entire foot and you don't need a thong. You can trim them with scissors to your own foot size and shape. Feels really bizarre when you peel them off. I would strongly suggest if you want to try to buy a pair, that you call them on the phone to order. Another solution is what Leah did: buy a pair of flip-flops, pull out the thong and replace it with clear plastic instead. Just be careful how the thong will interact with the foot wig! You may even want to consider making it in pieces to put around the thong (never tried it, but you probably could).
And if you can't get the Stick2Feet, and you don't want even a clear thong messing up your foot hair, you can try my version: buy a flip-flop (in season you can get them for $1!), pull off the thong and throw it away. Go to a wig store and buy some wig/toupee tape: it comes in regular strips the size of bandaids (50 to a box usually) or ask for "hurricane strength" that will probably come on a roll. Wash and dry your feet well, and put on 2 or 3 strips of tape: one across the ball of your foot, one from the heel up the side of your foot, and if you are particularly flat footed you might want a third strip from your heel closer to your arch. Then step onto the flip-flop starting at the heel and slowly roll your foot onto it. Stand firmly for a few seconds to adhere it well. On me they are good all day. If you have particularly sweaty feet you might want to try some spray anti-perspirant first, just make sure it's good and dry before you put the tape on.
©copyright 2004
Judy Mitchell